
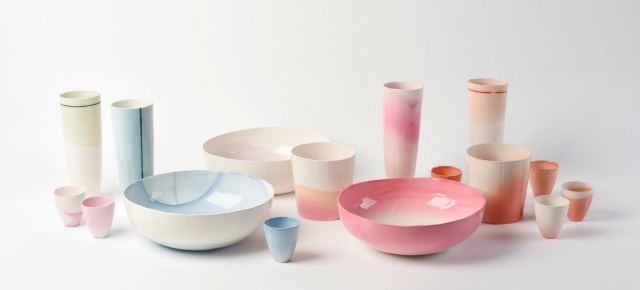

I have known Emma Buckley ever since she interviewed me for a university project about design blogs, and she has been working with me on a part-time basis alongside her studies ever since, so it is with great pride that I am now able to present her graduate project. Both she and I had agreed that I would judge it on its merits and only publish it if I genuinely liked it – and I really do! Dye Lines is a collection of colourful earthenware vessels, created using dyes traditionally used for textiles, and a new process through which the dyes are absorbed up through the surface of the ceramic vessels. The process is almost as beautiful as the end result.
Procion MX, a highly soluble dye, normally used for tie-dye or batik is inserted into the unvitrified, low-fired earthenware through a sandblasted gap in the glaze, dyeing the ceramics vibrant colours unobtainable using traditional methods. “The shape and size of the gap serves as the ‘blueprint’ for the final result, allowing a measure of control in a largely unpredictable process,” says Emma. “Over time, the pattern changes – the saturated colour gradually becomes muted as the water carrying particles of dye slowly evaporate through the point from which it entered, leaving the residue of dye behind.”

The pieces are slip-cast using white earthenware slip in plaster moulds. They are then glazed all over (which is unusual in ceramics – usually a ring or some ‘feet’ are left unglazed) with a clear glaze, to stop the dye from being drawn to any unglazed points and to prevent the dye from entering at any other points.

Vinyl and electrical tape is then added in preparation for sand blasting; the glaze on part of the base is sand-blasted off to expose the porous bisque underneath.

“I have used ‘em’ (my name) on the underside of vessels to simulate the traditional potter.” says Emma. “Some of the pieces have sandblasted lines at the top and bottom instead of the ‘em’ to give different effects as well as multiple entry points for the dye.”

Procion MX (Royal Blue) dye is mixed with water and poured into a bowl (for the purpose of the video it was poured onto a sheet of glass).”I used Procion MX specifically as it is very fine and soluble, other dyes don’t work due to their size meaning that they can’t be absorbed into the pores of the earthenware.” says Emma.

The vessel (with a sand blasted gap underneath) is placed on top of the dye.

The dye is absorbed through the pores of the earthenware in a process similar to capillary action and rises up the vessel underneath the glaze.

White gaps between dyes or in the middle of the bowl, for example, are created through the addition of bleach, which for some reason seems to push the dye further away from the point where it entered.

The vessel is put in the solution and it soaks up the bleach, more slowly than the dye, and – depending on the concentration of bleach – also disrupts the absorption of any dye following the bleach.

Another shade (in this case Indigo Navy) is then poured.

The vessel is put in the dye and soaked through again.

The bleach and water solution is then poured into the bowl (or onto the glass) again.

And so on until the vessel is complete.

I absolutely loved this project, launched at New Designers at the beginning this month. I think Emma has a bright career ahead of her and can’t wait to see what she does next.
Further reading for the especially geeky:
- here’s one I made earlier :: marble ways
- here’s one I made earlier :: bright as a button
- here’s one I made earlier :: emma alington’s with a twist
- here’s one I made earlier :: landscape of gravity


Won’t the dye eventually lose its colour over time, or if left in sunlight or put in the dishwasher?
The higher the concentration of dye in the solution, the less colour is lost. There seems to be a point at which the moisture is fully absorbed back into the air, leaving the particles of dye in the ceramic body unable to move and so the colour/ pattern is fixed
Sunlight doesn’t seem to affect the colour; I had a few test pieces sat on the window sill in direct sunlight with a line of tape on them to see if sunlight did anything and nothing happened. The test was conducted over the few months so am not sure about longer term exposure
The pieces are decorative so wouldn’t need to be put in the dishwater but I did test them, one with a sealant on and one without, and there wasn’t any change – although I left some tiled pieces I made in the rain and the dye moved around again and became very vibrant
There is lot of science behind the process, most of which I don’t fully understand and sometimes doesn’t make any sense – could talk about it for hours but I’ve tried to be concise!
this is such a cool process. did your friend emma come up with this on her own?? that’s incredible! also, i was watching the video while listening to “Goodnight, Travel Well” by the Killers, so the video was very dramatic for me haha
Thank you and yes – the process came from trying to dye everything, even the studio sink!
The technique is so pretty and natural. Thanks for sharing.
Wow! I love your work. Congratulations!
I like the watercolour effect on the pieces. They look very natural because they don’t look like they were painted. By using the dye to colour the pieces, is it safe to use the bowls and cups for dinnerware?