
In this week’s column, Fixperts Resident Maya Alvarado shares a day in her week working with British furniture manufacturer Benchmark looking for ‘fixes’ in their workshop and in the local community – this week she takes some utensil prototypes for Heidi, a local student who has cerebral palsy, to test out and starts work on a more comfortable footrest for her wheelchair.
06:45: I wake up, take a shower and eat some cereal for breakfast.
07:40: I start the day in the workshop and gather together some leather for a new footrest for Heidi’s chair. I will test this for size today and try to get the right shape before removing the existing one.
08:30: I hop on a train to Newbury to visit Heidi at The Castle Post 16. I have packed the utensil prototypes that I have made for Heidi to test. They all have different handles and I hope to find the one that suits Heidi the best today.
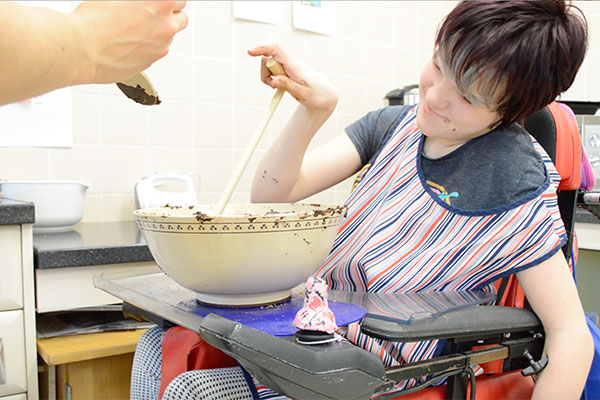
09:30: When I arrive at The Castle, I join the group in the kitchen. First Heidi tries the ‘loop spoon’ (above). The benefit of the loop is its two curved sides; Heidi can gain a secure grip in the centre and apply pressure on both sides depending on the desired direction of movement. The first quick prototype was only made of flat sheet MDF, but the next one will have a rounded depth to it for easier grip.

09:40: In comparison, the spoon handle I turned on the lathe is not as easy for Heidi to grip. It does not offer a large enough surface to apply pressure in the correct direction.

09:50: Heidi naturally pushes forward with her fist facing towards the direction of movement. The ‘T-shaped spoon’ suits this motion. The stem of the spoon comes out perpendicular to the bar which Heidi holds in her hand and supports a circular or side scraping motion.

10:00: The ‘half loop spoon’ is not as successful. It is a little awkward to twist and only provides half the surface for grip as the ‘loop spoon’. I ask Heidi to choose the utensils that work best for her and she chooses the ‘loop’ and ‘T-shaped’ spoons. I will develop these two further for a spatula and spoon.

10:30: The next project is Heidi’s footrest. I double a thick piece of leather from Benchmark up and weave it around the frame of Heidi’s footrest. I plan to stitch this securely in the right place, slipping it on to the bar at the right height. The leather is soft and gentle to rest on, but rigid enough to give a secure support.

12:30: Back at the workshop, I begin making the rounded handles for the ‘loop spoon’. I had planned to steam bend then handle, but Pete explains that the wood would be at its weakest at the top of the handle – the part that holds the most pressure. He suggests an alternative of layering up veneers to the form of a curve. I create a jig for the veneers using 30mm plywood finished with packaging tape to prevent sticking.
13:00: Lunchtime – macaroni cheese with green bean salad – yum!

13:15: Having glued up the strips of veneers using a roller and PVA, I wind them around the jig. Pete helps me to lock them all in place using several clamps. The different parts of the jig are tending to slip, so they require a lot of force in several directions. The tighter the clamps are locked the tighter the bond between the layers of wood. I have selected alternate layers of walnut, ash and oak to experiment with the contrasts between these after sanding.

14:00: In order to create the ‘T-shaped’ utensil, Pete cleverly suggests bending the layers over in two directions at a right angle. After these are glued, I can add layers across the two bends to strengthen them and to achieve the same thickness in the handle as in the stem of the utensil. The jig for this second layer is a little fiddly to make, as the dip in the middle must be accounted for. It takes a few trials and changes to this jig part to get it just right.

16:00: Once the glue has dried, I remove the clamps from the ‘loop spoon’ and use a router to curve the sides. First, I cut away excess material using the band saw until the layers of veneers all clearly sit flush with one another. I sand a little on each side with the belt sander and set up the router. The part is facing up and I have screwed on a bed (a surface for placing the material flat down onto) to move the handle along on. The router cutter part is a small radius and carves a quarter of the rounded handle at a time. This reveals a blending in the different layers, even forming fairly convincing grain ripples.
18:00: Having cut the glued handle off at a ‘V’, I secure it with resin into a prototype spoon face. It feels slightly too large to be in proportion to the length of the handle. When it is dry tomorrow I will shape it and decrease its size.
Further reading for the especially geeky:
- interview :: made by michael
- interview :: nordvink
- interview :: james molkenthin
- interview :: richard hardy